
Creative + Cheap Floral Mickey Ears Pumpkin

This post may contain affiliate links. If you purchase something through the link, I may receive a small commission at no extra charge to you.
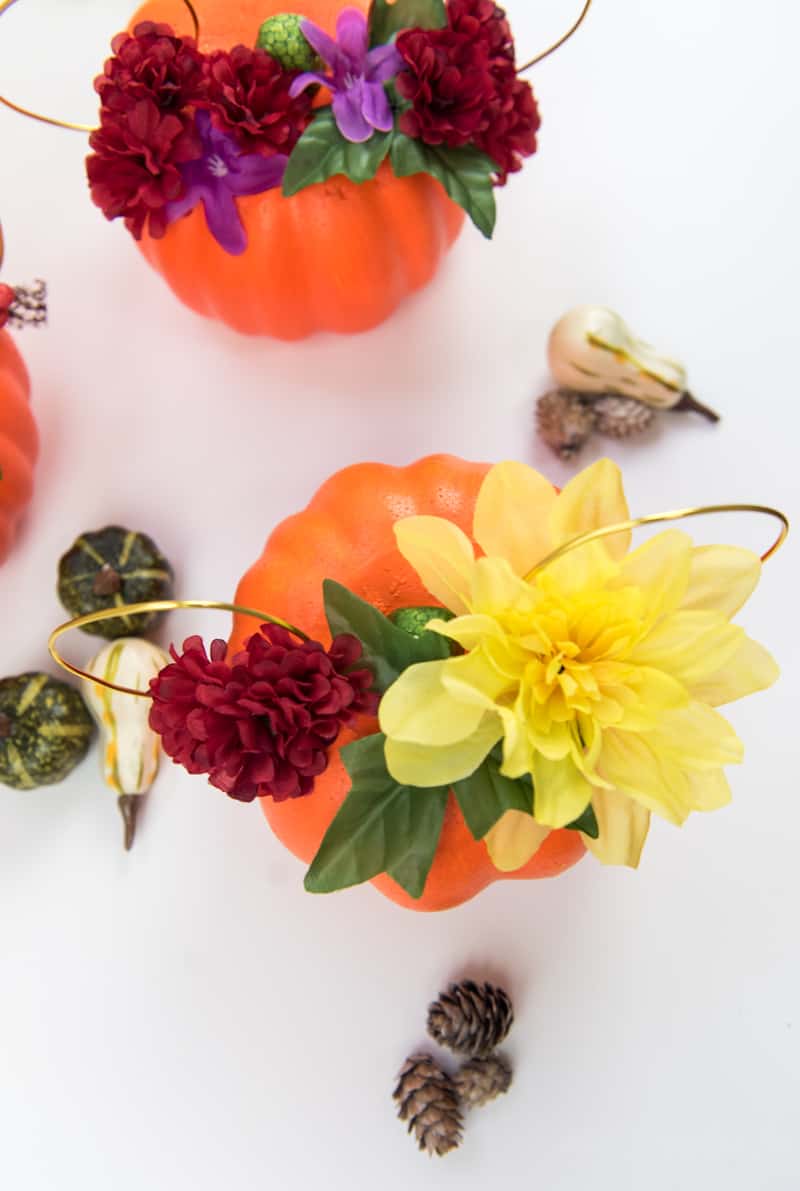
Skip the mess that comes with carving pumpkins and pick up a few styrofoam ones from the Dollar Tree to create an adorable Floral Mickey Ears Pumpkin that’ll last all season long!
I don’t know about y’all but I hate carving pumpkins. I don’t like the slime. Or the work. And I definitely don’t like the mess it makes. That’s why I’ve always liked the idea of the styrofoam pumpkins from Michaels but I don’t want to pay $14.99 a piece for 3 pumpkins. No thanks. I’m cheap like that. So I keep putting it off every year and telling myself that I’ll grab a few once they go on clearance after Halloween. haha Yea right. That never happens.
But this year I decided to pop into the Dollar Tree to see what they had available and I found three small (and cheap!) pumpkins to pick up! They were a little smaller than what I had originally wanted but in hindsight I think they work perfectly. They’ll be indoor decorations anyway so I don’t need anything too big that’ll take up a little too much space. Now, if they were going to be outside I’d definitely splurge for the bigger ones. But for indoor decor, the small pumpkins work well.

To be honest I’m not a huge fan of Halloween in general. I don’t like being scared, I hate spiders, and because of my food allergies I just never enjoyed handing over 75% of my candy to my sister. The only time I’ve ever enjoyed trick-or-treating has been at Disney World, they’re allergy-friendly and the chocolate they give us allergy people is so so SO good. If you haven’t gone to Mickey’s Not So Scary Halloween you need to put it on your bucket list. It’s so much fun and people really go all out in their costumes. Plus…the fireworks show and parade are my favorites out of any time of the year.
Seriously y’all. The Boo to You parade is so fun. AND the fireworks show is the best I’ve ever seen Disney put on. I’m not joking. There’s a reason we go back year after year.
Right now we have more than a month until our next trip, which means I’m bringing a little bit of Fall at Disney home to us in the meantime. And if you’re Disney fanatics like us you’ll want these Floral Mickey Ears pumpkins in your home too!
How to Make Your Own Floral Mickey Ears Pumpkin
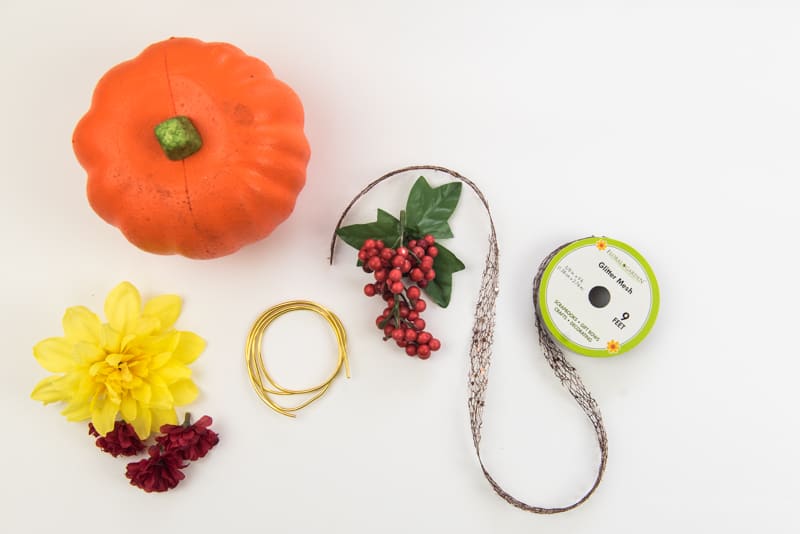
Materials
- Styrofoam Pumpkins (any craft store should have them)
- Flowers
- Floral Wire
- Hot Glue Gun
- Ribbon
- Mickey Ears (optional)
I just want to put a quick disclaimer in here: I am SO NOT GOOD at floral arrangements. So while I think these pumpkins are quite cute, I’m pretty positive that someone else with a good eye for floral arrangements could really make these pumpkins look gorgeous!
Okay, now that we’ve got that out of the way let’s get started on making our own floral mickey ears pumpkin!
The How-To
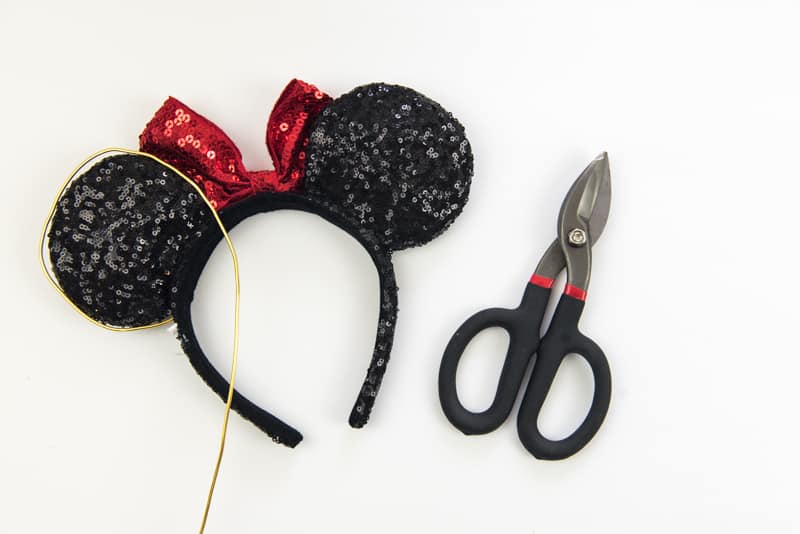
+ Grab your floral wire and start to mold it into a Mickey ear shape. I used my Mickey ears to get the general shape right, but if you don’t have your own pair you can eyeball it!
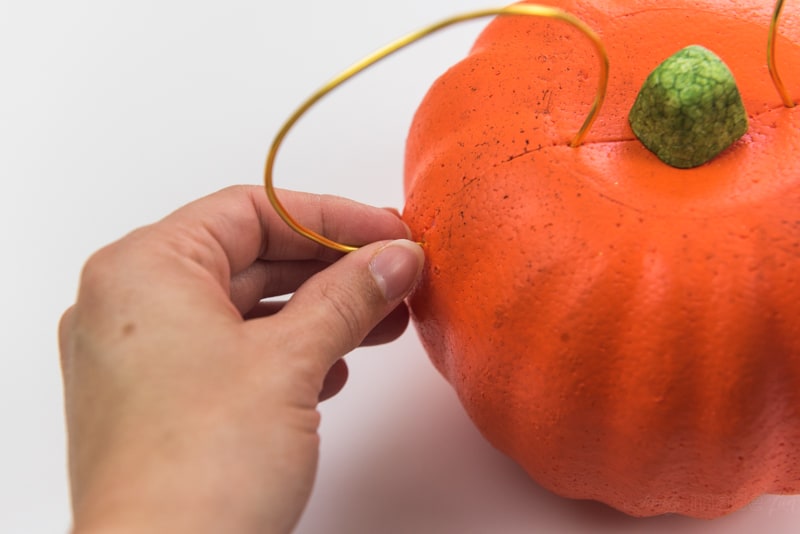
+ When you have both ears ready you can push the wire into your pumpkin. I went along the seam and just eyeballed it here as well. (which, you can totally tell because they are not perfect circles!)
+ Start placing your flowers around your ears. Do not glue them down yet! For now you’re just making sure you like the layout. Now’s the time to switch things around and see which arrangement you like best.
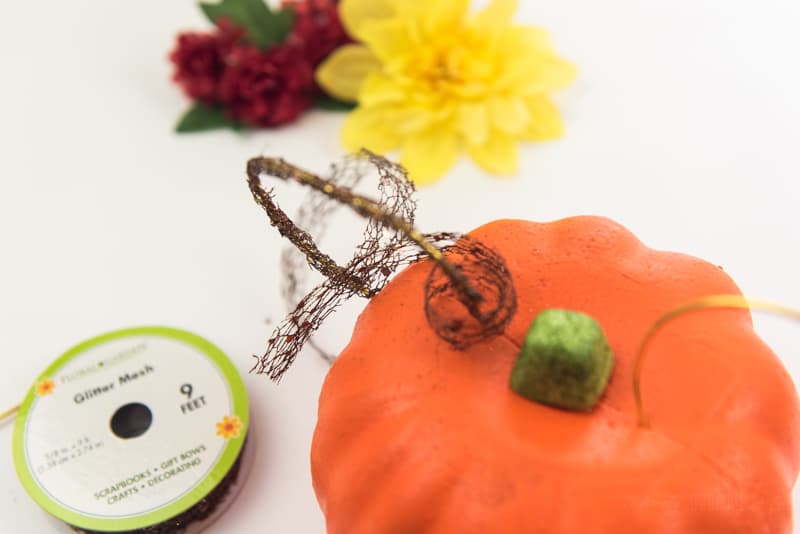
+ After you’ve gotten the general arrangement picked you can start gluing down your flowers.
Once I did the first one it was easy to figure out where to place everything. But….I do have a few tips for y’all before you attempt one of your own!
- GET SMALL FLOWERS if you decide to get smaller pumpkins. The bigger ones were a hassle to work with and honestly, I think I could’ve done more with lots of smaller flowers rather than a few smaller ones and one large one.
- You don’t have to hot glue your flowers on, though it does make them more sturdy. On a few I just pushed the stem into the pumpkin and everything held just fine.
- Unless you are a wizard your floral wire probably won’t make a perfect oval. But that’s okay because they’re handmade! So they’re bound to be a little imperfect, right?

So even though it’s 80 degrees here today and the sun is shining bright, I’m dreaming of Fall. And Disney. Plus all the yummy treats you can get at Mickey’s Not So Scary Halloween Party. Oh well, there’s always next year! At least I have these cute little pumpkins to keep the Disney spirit alive while we’re at home. Because, you know, we don’t have enough Disney memorabilia already.
These are so cute! What a fun idea! And also I do not like carving pumpkins either, it’s gross! I think I was in college the first time I carved one haha.
It’s so disgusting! Plus, the actual carving is a pain too. Especially if you use those little tools that come in those kits. No thanks. hahahaha I’m all about the fake pumpkins this year. 😉