
Pleated Clutch with Invisible Zipper
This post may contain affiliate links. If you purchase something through the link, I may receive a small commission at no extra charge to you.
I made another clutch!
I’m kind of obsessed with them at the moment.
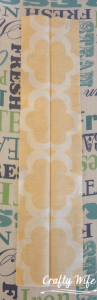
My mom asked for a clutch for her trip to Jamaica in November, and since I won that $20 gift card from Southern Fabric I figured the yellow fabric I used for my car pillow tutorial would make a great clutch! I was a bit disappointed when the fabric came in the mail and saw how big the pattern was. However, I was still going to try to make it work.
What I Used:
- 1/2 yard outside fabric
- 1 fat quarter (this will be used for the inside)
- 1/2 yard of interfacing (I used Pellon #808)
- Invisible zipper
- Bias tape that matches the color of the lining fabric
- Matching or coordinating thread
Let’s Get Started!
Start by cutting your fabric-
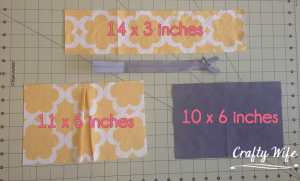
- Two pieces of 11 x 6 outside fabric
- Two pieces of 10 x 6 lining
- Two pieces of 10 x 6 interfacing
- One piece 14 x 3 outside fabric for the clutch strap
The reason to cut the outside fabric an inch bigger than the interfacing is because you need the extra fabric for the pleats.
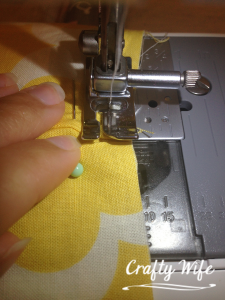
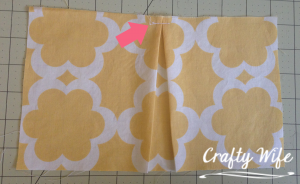
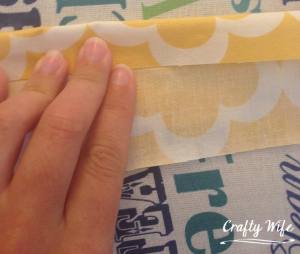
Mark the center of the outside fabric with a fabric pen (the center for me was 5.5 inches) and fold the fabric on each side towards the middle to make the pleats. Iron the top of the pleat to keep it in place, then sew a small, straight line right across the top.

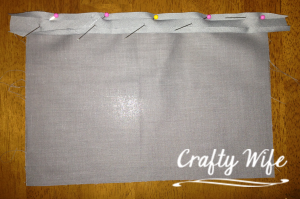
After you’ve sewn the pleat in place, attach your interfacing! Then, attach your bias tape to the lining fabric.
All Seams are 1/2 inch unless stated otherwise!
Take your fabric for the strap and fold it in half. Press the seam with your iron.
Open up your folded fabric, then fold each side towards the middle seam you just pressed. Then sew the sides of the straps together.
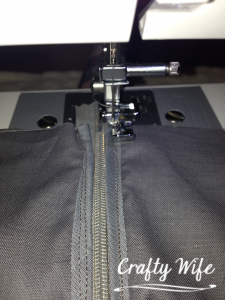
I’ve never sewn an invisible zipper before, so I had to reference a few other blogs for pointers. My two favorites have been by:
By Hand London, and
Clever Nesting.
They helped me a lot!
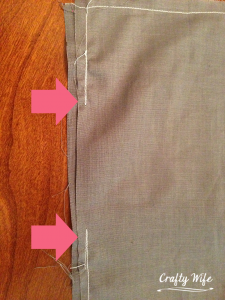
After sewing everything onto the zipper came the easy part. First, sew the lining together, leaving a 6 inch opening at the bottom. Don’t forget to back-stitch!
Next, sew the outside fabric up. Then pull the outside fabric through the six-inch opening in your lining.

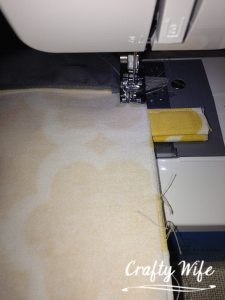
You’re almost done! Pull your outside fabric through the six-inch hold in your lining fabric. Then, stitch your lining fabric up!
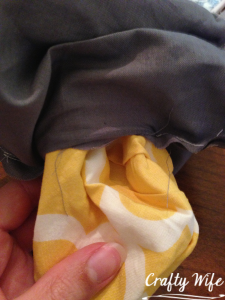
Press your seams down with your iron.
And…you’ve completed your pleated clutch!
 Of course, upon further inspection of my clutch I noticed that my zipper doesn’t work. I have no idea what the deal is since I’ve never had this problem before, but I have a feeling it’s because I used an invisible zipper this time.
Any suggestions on what might have happened? Remember, I’m a beginner so therefore my knowledge of all things sewing is kind of limited!
Great Tutorial! New folower! I would love if you would link up at Give Me The Goods Monday {1 party-5 blogs!!}! Amber@ Dimples & Pig Tales
Thank you, Amber! I will definitely be linking up at the party tomorrow. Thanks for the invite!
So cute! Wish I could sew 🙂
Thank you! 🙂
That is so stinkin’ cute!! If my sewing skills ever get better I would love to make this!
Thank you! It’s actually really easy to make. I’m a beginner too and I thought it would be much harder than it was. If I can do it I promise you can too! 🙂
So cute! I think I could actually do that!
Thank you! It’s very easy, you should give it a try! 🙂
I love love love this!!! How cool! I also love how detailed your tutorial is. I definitely think I could pull this one off. 🙂 Thank you so much for posting! Now following you on Bloglovin’!
Emily
http://emprovising.blogspot.com
Emily, thank you so much! 🙂 I always wonder if my tutorials make sense, and I’m so glad to know that they do!
This is such a great tutorial. I pinned it under my sewing board for later. I am always looking for new things to sew and this would be perfect. I bet my daughter would love it as a little purse.
Thanks for linking up at the Blog Strut and co-hosting 🙂
Thank you! It’s definitely one of my favorite sewing tutorials I’ve ever done. Thanks for hosting such a great link party and for letting me join in every week. 🙂
How wonderful that you’ve detailed the steps so nicely! Thank you for sharing and for co-hosting the Peacock hop!
Thank you! And thanks for joining the link party! I hope you’ll continue to join us every week. 🙂