
How to Use the Dry Hinge Method on a Large Wood Sign
This post contains affiliate links. I may earn commission from qualifying purchases at no additional cost to you. I will never recommend a product I don’t use or trust.
Learn how to cut a vinyl stencil that’s bigger than your machine and perfectly line it up using the dry hinge method on a large wood sign!

Most of us use a 12×12 cutting machine when we craft. And every so often we decide to punish ourselves and try to make a craft that’s bigger than our 12×12 cutting mat.
Silhouette is coming out with bigger (wider) cutting machines this year and while that’s exciting, most of us that are hobby crafters won’t be investing in them. I don’t cut a lot of things that are bigger than my machine because I don’t feel the need.
So when you get that itch to create something that is huge, how do you do it? And how do you line up the multiple cuts so that they are (mostly) straight once you go to put it on your wood piece?
Let’s talk about the dry hinge method!

I am a completely impatient person and it really shows in my craft projects. Even this one. The sign for sure isn’t perfect.
Taking the time to line up my vinyl and checking and double checking to make sure it looks nice is not my idea of a good time.
I just want my projects done. And quickly.
Is that the best way to craft? Probably not. I figure that most of the stuff I make is just for me and it doesn’t really bother me if it’s off a little bit.
But since this Doctor Who sign will be hanging right beside my front door and we always have people coming and going from our house, I figure I need to put in a little more effort.

What is the dry hinge method?
The dry hinge method uses tape to hold one side of your vinyl decal in place while you remove the backing on the other side and apply the decal to your surface.
I first learned about the dry hinge method a few years ago when I used it on a sign for my nephew’s first birthday. It’s a method that takes a bit of time but it really does help take your designs to the next level.
What tools do you need for the dry hinge method?
You will need a:
- pencil,
- eraser,
- blue painters tape, and
- a really really big ruler.
How to get started with the dry hinge method.
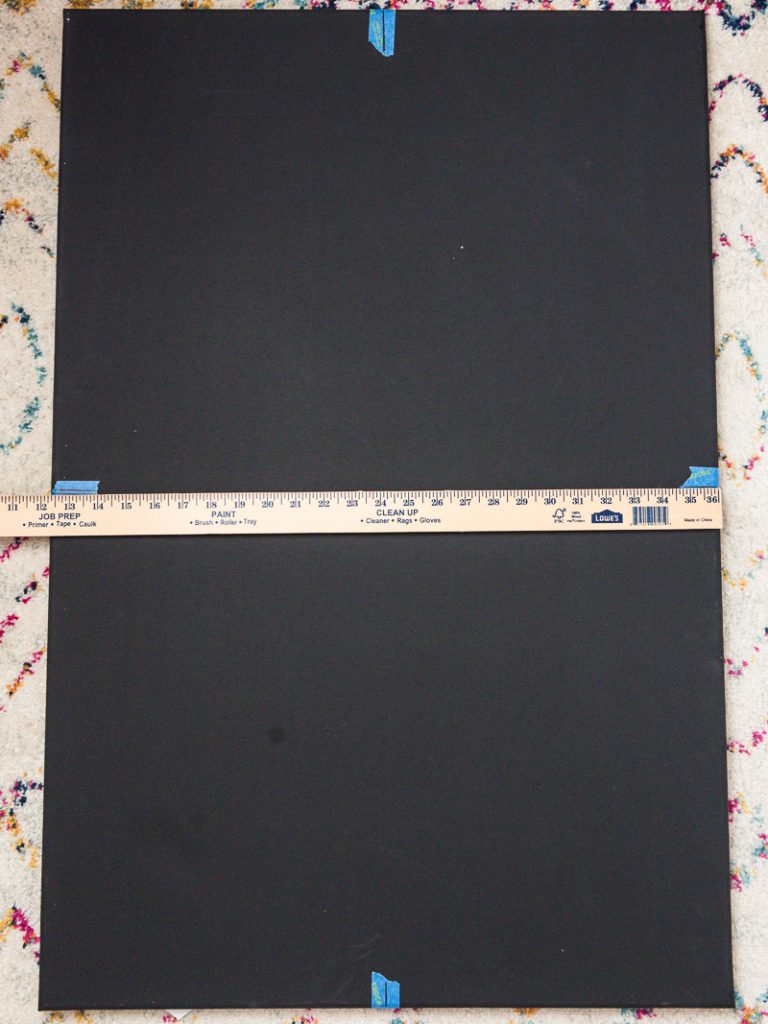
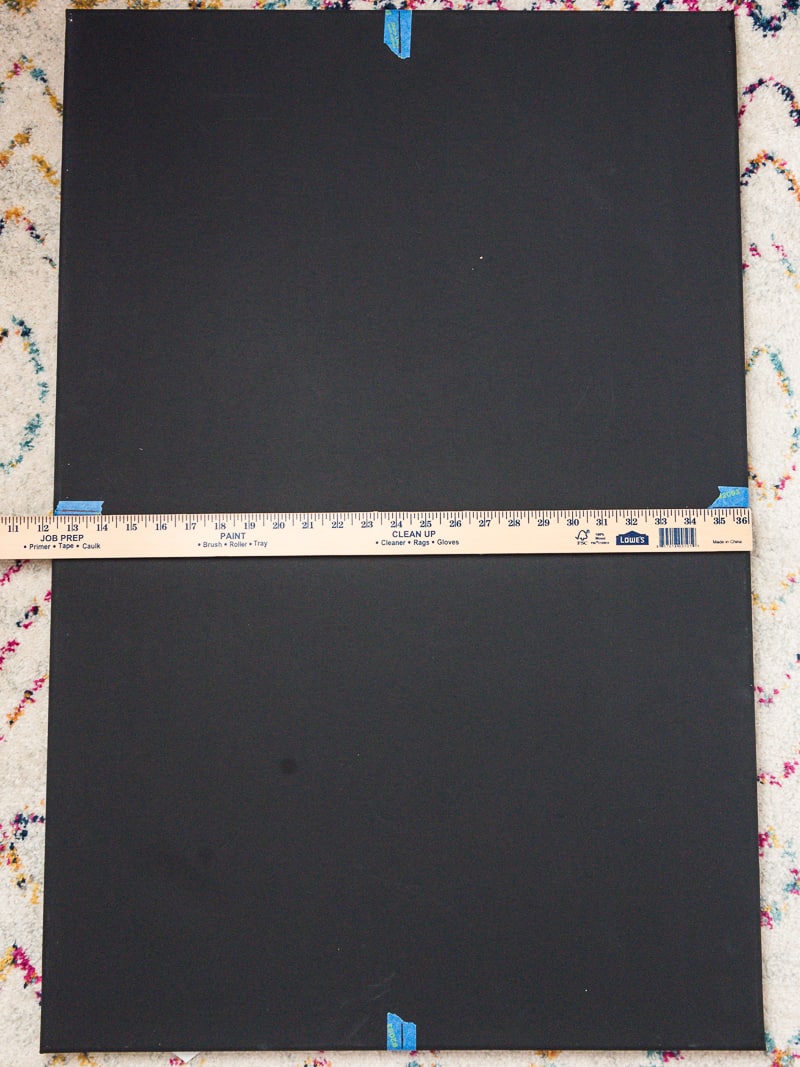
After you paint your board and it’s dry, grab your ruler and pencil and find the center of the top, sides, and middle of your board.
Because my board is black I used painters tape to mark the center. It’s easier to see than a pencil on a dark background.
Next, find the center of your vinyl decal. Line up your decal using the marks you made in the steps above.
Once it’s lined up perfectly, use painters tape and tape down one side of your vinyl decal (I chose the left side). I also like to put a piece of tape right down the middle.
Remember: leave the backing on your vinyl! Do not take it off yet.
How to get your vinyl decal on the large wood sign.
Pull up the right side of your vinyl decal and remove the backing. Working from the center out, place your decal on the wood.
Once your decal is on the wood, remove the tape from the middle and left hand side. Then remove the backing and place your decal down on the wood.
Stand back and check out how perfectly straight your design is after all that work!

How do you get the stencil straight if you’re cutting multiple pieces?
This was the hardest part for me, which you can tell if you look towards the bottom of my sign!
To make sure that the stencil was lined up on the sides I went from the bottom up. I spaced the last line, which was the longest, about an inch in from the side of the board and then used a ruler to evenly space every piece of stencil that was cut.
When should you use the dry hinge method?
If we’re being honest, you can use it on any project!
I really love using it on mugs, ornaments, wood signs, wall decals, and more.
It’s really helpful when it comes to lining up your designs. And while it does take a while to get the hang of it at first, it is well worth it.

You should use the dry hinge method on a large wood sign because…
- it helps you get your decal straight,
- it helps keep the decal in place as you’re putting it on your surface, and
- it’s a helpful tool to use to give your finished projects a more professional look.

How to Use the Dry Hinge Method on Large Vinyl Decals
Learn how to use the dry hinge method on your vinyl decals to give your finished projects a more professional look.
Materials
- 30x40 piece of Plywood
- Painters Tape
- Pencil
- Black Chalkboard Paint
- White Chalkboard Paint
- Paint Brushes
- Polyurethane Interior Sealer
- Dr Who SVG Quote To Buy (or make your own)
Tools
- Orbital Sander
- Silhouette Cameo
- Weeding Tool
- Transfer Tape
- Large 36in Ruler
Instructions
How to do the dry hinge method:
- Pick up your plywood from the home improvement store. (see note #1)
- Come home and use your orbital sander to sand your piece of wood. Then use a dry cloth and wipe it down. (see note #2)
- Paint your board and let it dry. While it's drying cut your vinyl design on your Silhouette Cameo.
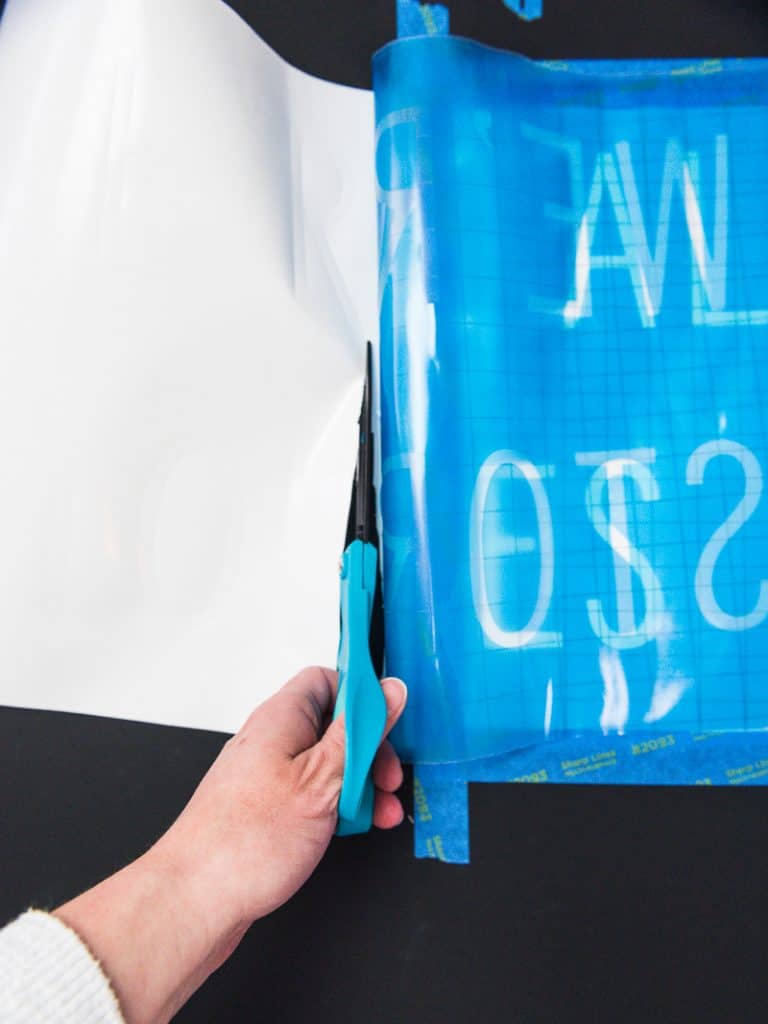
- Weed your vinyl design and place transfer tape on top of the vinyl. Do not remove the backing from your vinyl yet!

- Once your board is dry, use your ruler and pencil to mark the center of the tops, sides, and the middle of your board. (see note #3)
- Use your ruler to measure and mark where the center of your vinyl design is. Then line it up on your board.
- Using your painters tape, tape down one side (I chose the left side) of your vinyl design and then place a piece of tape down the middle of your design.
- Lift up the right side of your vinyl design and remove the backing. You'll cut the backing near the piece of tape that runs down the middle of your design.
- Then, working from the center out, lay down the vinyl design and rub it onto your wood piece.
- Once the right side is down, remove the tape from the center and left side and repeat step 7 and step 8.


How to paint your stencil so it doesn't bleed through:
- Once your stencil is on the wood piece, paint a thin layer of your background paint (it's black for me) and let it dry.
- After it dries, paint over your stencil (this is the white paint for me). Doing a very thin layer will stop the paint from bleeding underneath the stencil.
- If you need to do another layer, let the paint dry and then do another layer of your top coat.
- Remove the stencil while your paint is still tacky.
- Then use a sealant to paint over your wood to seal the paint.
Notes
1. If you're going to use Plywood go to Lowes and find pre-cut pieces of cabinet grade plywood for under $10. A reader tipped me off to this and it's such a great find! Don't use the Plywood in the lumber aisle.
2. Do not skip this step! You want to remove all the dust so that it doesn't get trapped underneath your paint and cause issues with your vinyl adhering to the board later.
3. I used painters tape to mark the spots because it was easier to see on a dark background! Also, my eyesight sucks so....painters tape is definitely easiest for me to see!
4. I love my vinyl roll feeder for projects like these! They keep long pieces of vinyl straight as your machine cuts them so you don't have to worry about them moving around and ruining a huge piece of finyl.
Recommended Products
As an Amazon Associate and member of other affiliate programs, I earn from qualifying purchases.

Learn to love your Silhouette and craft like a rockstar!
[pt_view id=”595ccf6svf”]