
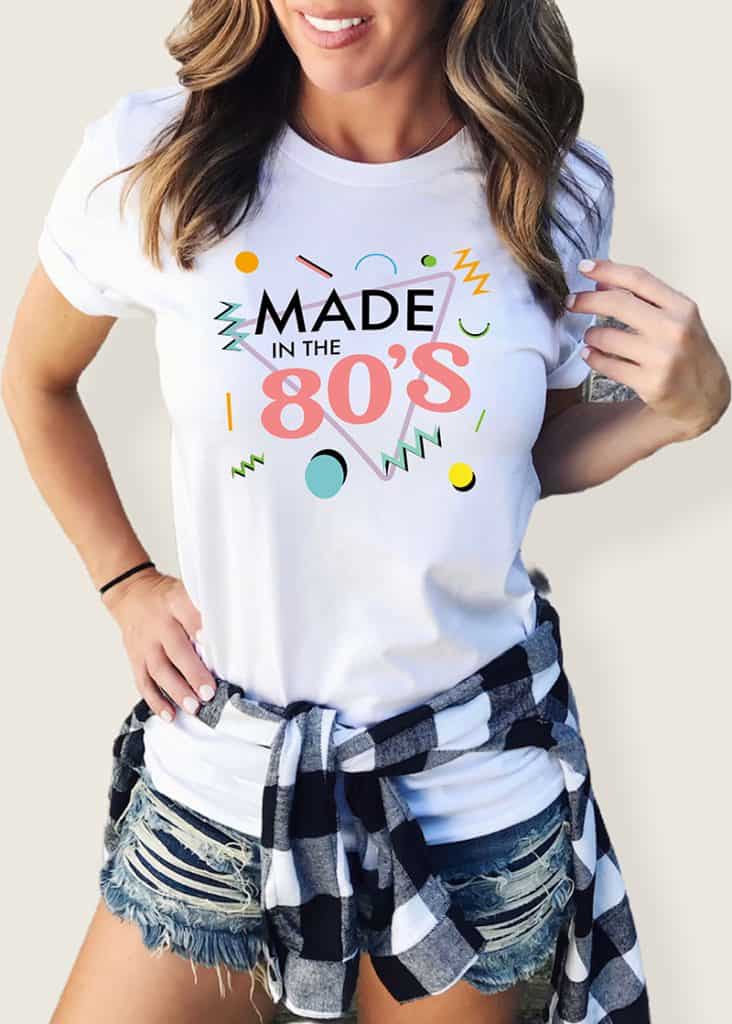
Made in the 80’s Birthday T-Shirt


This post may contain affiliate links. If you purchase something through the link, I may receive a small commission at no extra charge to you.
If you were born in the 80’s, this made in the 80s birthday t-shirt is a perfect diy to make for your big day! It is totally rad and perfectly retro.
I’m definitely aging myself today with this t-shirt, but my birthday is in November and I will be wearing this shirt all month long!
When I showed Chris this cut file he immediately said it reminded him of Saved By The Bell, which is exactly what I was going for! I was obsessed with Saved By The Bell growing up and Zach Morris was my first “real” crush.
It was only fitting my birthday shirt paid homage to my favorite childhood show, while also celebrating me being “made in the 80’s”!

This shirt can be made with heat transfer vinyl or you could do sublimation!
This design is perfect for sublimation because there are a lot of different colors in the design and it would be easier than trying to layer them all with heat transfer viny.
But, since I recently tried sublimation I decided to use heat transfer vinyl for this made in the 80’s birthday t-shirt. So we’re going to talk about layering htv and how to line it all up perfectly the first time so you don’t have to remove your vinyl and try again.
Materials
Everything you need to make this made in the 80’s birthday shirt!
- Bella Canvas T-Shirt (my favorite because they’re soft and super comfy!)
- Silhouette Cameo
- Heat Transfer Vinyl (all different colors)
- Heat Press

Common questions about this made in the 80’s birthday t-shirt!
What type of heat transfer vinyl do you need to use with this t-shirt?
I love Siser Easyweed Heat Transfer Vinyl for shirts. Stretch HTV is also good because it’ll stretch with the shirt without weakening the adhesive.
We have a whole post on what htv is and how to use it here!
Can you use this free svg as a sublimation print instead of using heat transfer vinyl?
Yes you can! And you do not need a sublimation printer to make your own sublimation projects.
Head to this post to see how we made a sublimation shirt without having a sublimation machine of our own!
I like sublimation when you have an intricate design with a lot of different colors. This Made in the 80’s Birthday T-shirt is a perfect design to use with sublimation if you decide to try it!
Heat Press, Iron or Cricut EasyPress?
This question gets asked a lot and the answer is different depending on who you ask. I’ll break this part down into three different sections so it’s easier to read.
Iron
Irons work really well on very small heat transfer vinyl designs. They’re typically not great to use for shirts or any big designs because you will not get even pressure on your vinyl, which can lead to it lifting off the shirt.
Irons also have steam holes on the surface which also contributes to uneven pressure.
If you’re just starting out with htv, try an iron. But know that it’s possible for the vinyl to only last on the shirt through one wash if you aren’t using enough pressure when pressing your design onto your shirt.
Cricut EasyPress
I have an older model Cricut EasyPress and I loved it! Depending on the size you get (you should get at least a 9×9 if you’re doing adult t-shirts) you can press bigger designs easily and quickly.
An easypress gives you even pressure and the newer versions of the Cricut EasyPress can heat up to 400 degrees – which you need for sublimation!
The problem with the easypress is that it’s expensive for what it is and it’s usually smaller than an actual heat press.
However, if you don’t have a lot of space to store a traditional heat press or if this is just a hobby for you….a Cricut EasyPress is a great tool to have.

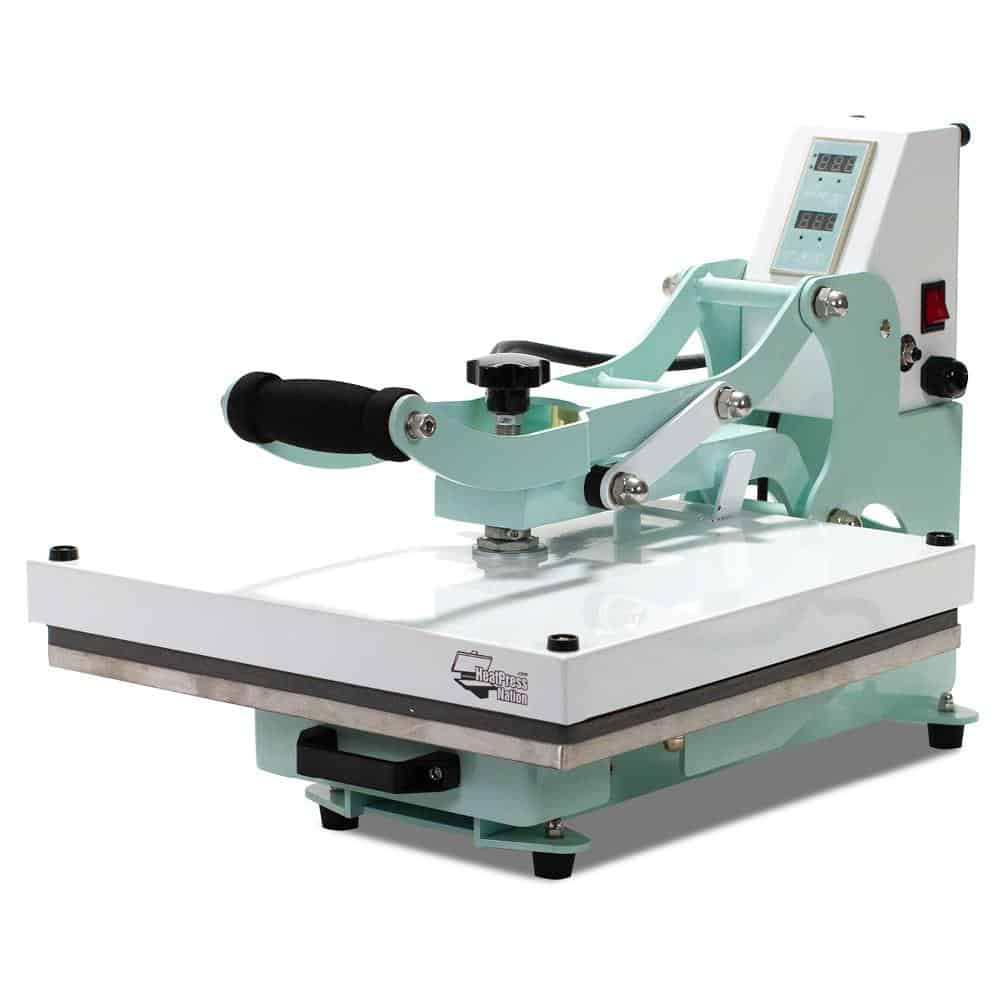
Heat Press
I upgraded to the CraftPro 15×15 Heat Press earlier this year and it was the best purchase I’ve made for my business.
I make a lot of t-shirts and I needed a press that was large enough for me to do XXL shirt designs with one press.
I chose the CraftPro because it’s a more compact heat press and doesn’t take up as much room as a traditional one. It is more expensive than one you can buy on Amazon (this one is very highly rated in the crafting community) but from all the research I did, Heat Press Nation is one of the more trusted and reliable heat press companies to buy from.
I love my heat press but I also know it’s a big purchase and unless you’re making a business out of t-shirts it’s probably not something you’ll want to spend money on.
But if you are deciding between a Cricut EasyPress or a traditional Heat Press….heat press all the way. You get more for your money that way!

FAQ’S for this Made in the 80’s Birthday T-shirt
How do you make sure your design is in the center of the shirt?
I learned a while ago to fold my t-shirts in half (sleeve to sleeve) and use my heat press to press the crease.
You can see how we used this trick for this Valentine’s Day shirt!
You can also fold your vinyl in half (make sure the sticky sides are facing out) to find the center of your vinyl design.
How long do you press each layer for a multi-colored design?
With the CraftPro Heat Press I heated it up to 315 and pressed each layer for 10 seconds.
It’s a bit of trial and error depending on what type of heat press you’re using. The best thing to do is to try to press for 5 seconds and then see if your vinyl has adhered to your shirt by lifting up the transfer sheet. If your vinyl design comes up with the transfer sheet then you need to press for a little bit longer. Keep doing this until you find the amount of time that works for you!
Once you have every layer adhered onto your shirt, do one final press for the full amount of time (mine was 20 seconds).
Download our free heat transfer vinyl sizing and placement guide!
GRAB 20 FREE BIRTHDAY CUT FILES!
Every month I team up with a group of amazingly talented crafters to bring you a bundle of free svg cut files! This month’s theme was birthdays, which is perfect timing because I’m turning 36 next month! You can download all of these awesome files by visiting the blog posts (links are underneath the image). All svg cut files are free to use for personal use only and don’t forget to tag us on Instagram (#svgdesignsquad) if you make one of our projects and share it!

- Happy Birthday Cake Sketch/ Foil Quill Design by Persia Lou
- Cactus Cupcake Topper by Amy Robison
- Happy Birthday Cake Topper by Crafting Overload
- Birthday Emoji Mini Pinata by Studio Xtine
- Calories Don’t Count on Your Birthday by Polka Dotted Blue Jay
- Birthday Cake Paper Box by Oh Yay Studio
- Cupcake Gift Card Holder by Gina C. Creates
- Birthday Wine Glasses by Pen + Posh
- Birthday Girl + Birthday Boy by Kayla Makes
- Happy Birthday Topper by Poofy Cheeks
- Happy Birthday Print and Cut Card by Crafty Life Mom
- Birthday Hat by Me and My Inklings
- Birthday Wishes by Liz on Call
- Multi-Colored Birthday Card by The Bearded Housewife
- Here for the Cake by Sunshine and Munchkins
- Wish Big by Lettered by Stephanie
- Gift Tag Shaker by Craftara Creates
- Unicorn Birthday Card by Spot of Tea Designs
- Made in the 80’s by Simply Made Fun
- It’s My Birthday by Tried & True Creative
More Heat Transfer Vinyl T-Shirt Crafts
- DIY Layered Harry Potter Shirts
- How to Distress Heat Transfer Vinyl
- How to Use Heat Transfer Vinyl
- How to Remove Heat Transfer Vinyl If You Mess Up
- Where to Buy Patterned Vinyl

Made in the 80's Birthday T-Shirt
Download this made in the 80's birthday svg and use it on t-shirts, drink koozies, pillows and more!
Materials
- Bella Canvas T-Shirt (can find at Michaels)
- Heat Transfer Vinyl (multiple colors)
Instructions
- Download the Made in the 80's Free SVG Cut File.
- Open the file in your Silhouette Software.
- Cut each color out separately and weed them.
- Heat up your heat press.
- Fold your t-shirt in half and press with your heat press. Open up your shirt, you'll see a crease down the center of the shirt that will help you line up your design so it's straight.
- Start layering your heat transfer vinyl. Make sure you only press for 10-15 seconds with each layer!
- Once you've pressed the entire design on the shirt do a final press of 20-30 seconds.
- Your shirt is done!
Recommended Products
As an Amazon Associate and member of other affiliate programs, I earn from qualifying purchases.


YES YES YES YESSSSS! I love this so much@